Thermometer and hygrometer
In order to measure temperature and relative humidity parameters in a location and transmit them to a server that has the following services installed: MQTT , Telegraf , InfluxDB , and Grafana , the following development board from Wemos, which is compatible with the Wemos D1 R2 & MINI board in the Arduino or PlatformIO environment, can be successfully used:

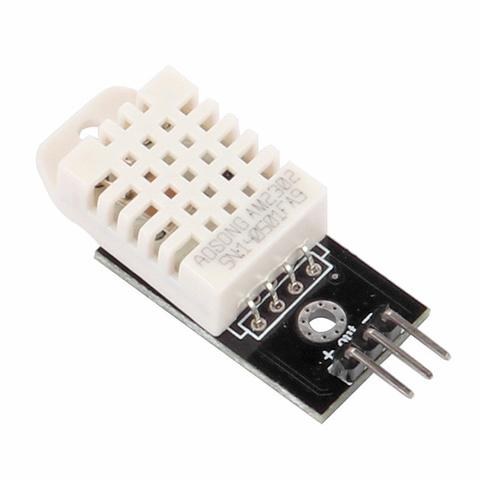
In addition to this, we also need a DHT22 sensor necessary for measuring temperature and humidity parameters:
The development board reads the data transmitted by the DHT22 sensor at pin D2, which corresponds to GPIO4 or pin 4 in Arduino.
After connecting the board to the AP via WiFi, it will transmit/publish the parameters read from the DHT22 sensor to an MQTT server. Telegraf retrieves the published parameters in the topics "sensors/esp8266/humidity" and "sensors/esp8266/temperature."
The published parameters are in the form (as seen in the MQTTfx client) :
TempCamera Temp=24.0
UmidCamera Umid=32.0

After the acquisition, Telegraf will create two tables (measurements) TempCamera and UmidCamera in the espduino database (please read the installation and configuration page of Telegraf ):

The code used is as follows:
#include <Arduino.h>
#include <ESP8266WiFi.h>
#include <PubSubClient.h>
#include <Wire.h>
#include <Adafruit_Sensor.h>
#include <DHT.h>
#include <DHT_U.h>
//
//Definesc constantele
//
//pentru senzor
#define DHTPIN 4 //The pin where the digital output from the DHT22 sensor is connected
#define DHTTYPE DHT22 // define the DHT22 model (AM2302)
//
// pentru WIFI
const char* ssid = "xxx";//SSID unde mă conectez
const char* wifiPassword =  "xxx";//parola aferentă SSID-ului
//
//pentru serverul MQTT
const char* mqttServer = "xxx.xxx.x.xx";//adresa serverului MQTTT
const int mqttPort = 1883;//portul de acces la serverul MQTT
const char* mqttUser = "esp8266";//utilizatorul ce are acces la serverul MQTT
const char* mqttPassword = "parola";//parola utilizatorului
const char* topic_umiditate = "sensors/esp8266/umiditate";//topicul pentru umiditate
const char* topic_temperatura = "sensors/esp8266/temperatura";//topicul pentru temperatura
//
//Definesc funcțiile
void setup_wifi();
void reconect();
//
//Definesc obiectele
DHT_Unified dht(DHTPIN, DHTTYPE); //definesc obiectul dht
WiFiClient espClient;//definesc obiectul espClient
PubSubClient client(espClient);//definesc obiectul client
//
//
float T, H;//definesc variabile necesare temperaturii și umidității
//
void setup() {
  // codul din acestă funcție este rulat numai odată după alimentarea microcontrolerului
  Serial.begin(115200); //inițializez comunicația serială folosită numai pentru debug
  //
  delay(10); //o mica intarziere
  dht.begin();// inițializez senzorul DHT22
  setup_wifi();//apelez funcția
  client.setServer(mqttServer, mqttPort);//inițilizez conexiunea la serverul MQTT
  //
  Serial.println("Conexiune seriala stabilita...");
}
//
void loop() {
  // codul din funcția loop se rulează la infinit:
  sensors_event_t event;
  dht.temperature().getEvent(&event);
  T = event.temperature;
  dht.humidity().getEvent(&event);
  H = event.relative_humidity;
//
Serial.print("Temperatura: ");
Serial.print(T);
Serial.print(" C; ");
//
Serial.print("Umiditatea: ");
Serial.print(H);
Serial.println(" %;");
//
if (!client.connected()) {
  reconect();//dacă utilizatorul nu s-a conectat la MQTT, reincerc
}
//
String MSG_T = "TempCamera Temp=";//construiesc tabela și câmpul - pentru InfluxDb
String MSG_H = "UmidCamera Umid=";//construiesc tabela și câmpul - pentru InfluxDb
String StrT = String(T).c_str();//transform în String datele de tip float
String StrH = String(H).c_str();//transform în String datele de tip float
String Temp = MSG_T+StrT;//concatenez mesajul pentru temperatura
String Umid = MSG_H+StrH;//concatenez mesajul pentru umiditate
client.publish(topic_temperatura, Temp.c_str(), true);//public temperatura
client.publish(topic_umiditate, Umid.c_str(), true);//public umiditatea
delay(1000);
}
//
void setup_wifi() {
delay(10);
Serial.println();
Serial.print("Ma conectez la ");
Serial.println(ssid);
//
WiFi.begin(ssid, wifiPassword);//inițializez conexiunea wifi
//
while (WiFi.status() != WL_CONNECTED) {
  delay(500);//aștept jumătate de secundă
  Serial.print(".");
}
//
Serial.println("");
Serial.println("S-a stabilit conexiune WiFi");
Serial.println("Adresa IP: ");
Serial.println(WiFi.localIP());
}
//
void reconect(){
  while(!client.connected()) {
    Serial.println("Astept sa ma conectez la serverul MQTT...");
    if (client.connect("ESP8266Client", mqttUser, mqttPassword)) {//trimit id-ul, utilizatorul și parola pentru conectare la MQTT
      Serial.println("m-am conectat");
    }
    else {
      Serial.println("eroare, nr= ");
      Serial.print(client.state());//scot nr erorii, in caz de aparitie se va invetiga motivul
      Serial.println(" incerc din nou in 5 secunde");
      delay(5000);//astept 5 secunde
    }
  }
}
To create a graph in Grafana, we need to query the database as follows:

and the final result in Grafana is as follows, where we can see that the temperature sensor is not "shining", due to the appearance of spikes (software filtering is necessary) and the temperature variation is caused by the lamp on the desk :):

The spikes were from the power supply; after I disconnected the USB power and relied only on the battery, they disappeared, as the English say, "work smooth":
